Alumilite Resin Casting and Finishing a Knife Handle
Last updated on May 30th, 2024 at 12:02 am
Like most people, I don’t have a means to process my own steel blade. I don’t have the means to blacksmith or heat-treat a knife at home, though I will someday. In any case, I wanted to make a knife as a one-of-a-kind heirloom piece that I can gift or pass down at some point. I decided to craft a one-of-a-kind knife handle from a blade blank using Alumilite resin. Alumilite casting has been pretty well documented for knife handle material and I thought I’d give it a shot. For this project, I used Alumilite RC-3 which dries to a solid color, and is the cheapest dollar-per-oz formula I could find.
Tools and Materials Used:
I do a lot of DIY stuff so I had some tools and material laying around. Some tools can be used in place of tools I used so I’ll try to list them out accordingly
Tools Used:
- Rockwell Bladerunner X2 Portable Tabletop Saw
- You could use a 2-position hacksaw to get tasks done with more effort
- Cheap Corded Power drill with drill bits
- A Ball Peen Hammer
- A grams/grains scale with good range
- Assorted Wood Clamps
Materials Used:
- Jantz Silver Moose Knife Blank
- Condor Bushlore Knife Blanks highly recommended
- Alumilite RC-3 (Tan)
- Some interesting wood
- Resin casting pigments
- 1/8-inch brass rod for handle holes
- 1/4-inch hollow brass rod for thong hole
- 2-in Screws
- 1-inch thick cutting board
- Paper mixing cups
- Mixing Sticks
- Assorted 140-3000-grit sand paper
- 80-grit sand blaster sand paper
- Devcon 2-ton Epoxy (I didn’t use this, but I would use this next time)
Step 1: Choose a Knife Blank
I wanted a stainless steel hunting knife that could double as bushcraft knife. I ordered one of the more expensive Jantz Silver Moose pattern in CPMS 30V. This steel has high-carbon qualities that I wanted, like high hardness, and is still considered a full stainless blade material.
The overall length is 7-5/8-inches with a blade length of 3-inches, width of 1-inch, and 1/8-inch thickness. As a hunting knife, this is capable of processing both large and small game. The dimensions, though small for bushcraft, will be great for skinning.
CPMS 30V has good edge retention. While I haven’t processed game with this knife, I have made some feather sticks and the edge holds up nicely. The back of the knife has a nice 90-degree edge on it which strikes a ferro rod well.
Step 2: Determine Handle Material
I wanted something decorated and exotic. Full disclosure: I bought the wrong Alumilite formula, which turned into a beautiful mistake. For the wood pieces, I inherited a wedding centerpiece that had manzanita branches as the main material. Manzanita is a decorative hardwood, but isn’t used as much for knife handle material. Being an experiment, I cut sections of this on my Rockwell Bladerunner and it looked cool enough to use. I’ve learned that Manzanita is very hard and rough on blades.
The Alumilite I used was Alumilite RC-3 Tan, which cures to a mostly-solid tan color. I bought the 32-oz kit which includes two 16-oz parts (A & B) for a total of 32-oz. I’ve been able to make 3 molds so far, and have enough for one more test.
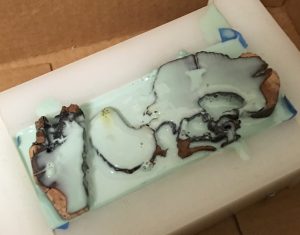
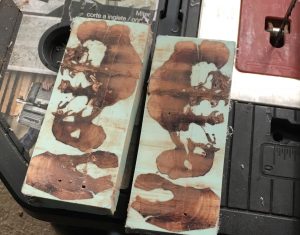
I mixed in blue pearl and white pearl pigment thinking I’d get a nice pearl translucent look. Because RC-3 is a solid, it cured seafoam green. I was going to toss it, but my fiance had said it could make a beautiful knife, so I gave it a shot. I’m loving the result.
Step 3: Make a Mold
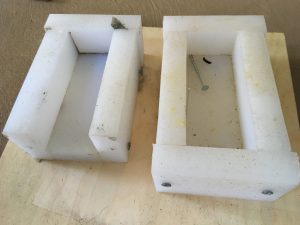
For my mold, I used an NSF certified Polyethylene 12x18x1-inch cutting board. The most important dimension here is the 1-inch thickness for assembling with 2-inch screws. Again, using my Rockwell Bladerunner, I cut this into sections that were appropriate. The dimensions are based off of a standard knife scale and creates castings that are 5-inch x 2-inch. The walls on my mold are about 2-inches tall to accommodate oversized cuts. You can do this with a hacksaw with lots of patience.
Step 4: Alumilite Resin Casting Time
I can only speak to RC-3, but this thing has a 7-minute cure time. That is, it goes from mixed to hard in 7-minutes. Alumilite RC-3 has a pot life of only 3-minutes, so I timed my pour and gave myself 2-minutes. I gave it 1-minute for stirring the parts together and 1-minute to settle in. Plan on building in time for the resin to settle so that air bubbles are reduced.
The casting guys generally recommend a 2.5 gallon paint pressure pot with a compressor and gauges. I didn’t find one necessary but this is DIY. I’m sure this would have created a better product, but I was able to fix any mistakes carefully.
Alumilite Casting Without a Pressure Pot
This was truly a kitchen counter, open-air cure. I sealed the gaps in my mold with some plumbers putty and painters tape. Then, I fit the pieces of wood in the mold and stuck it in the oven at 170-degrees for 10-minutes. This does two things: 1) helps dry out any excess moisture that may have been introduced and 2) heats up all the bits, helping the Alumilite resin get into all the gaps in liquid form.
You will want to pour each part of the Alumilite in to two separate paper mixing cups at the exact same weight using an electronic kitchen scale. I eye-balled the amount of 1100-grains for each part for my mold, so your mileage may vary. Don’t take this for an exact science. Once the two parts are poured into separate cups, I let both cups sit for about 10-minutes to help degas a bit. I then added my resin pigments to one of the parts (the clear one) and stirred it up. I let it rest again to degas a bit.
Start a timer before you combine parts A & B to give the pour some time to fill in and move air to the top as much as possible. Take the mold with scrap wood out of the oven. Combine and stir the Alumilite parts for a full minute, making sure you mix thoroughly and don’t see unmixed parts. Make sure to scrape the cup on the sides and bottom to get a good mixture. At about a minute (1.5 if you really need time), start pouring in from one corner of the mold medium-slowly to allow for the resin to move through the mold. It helps to squish the cup a but to give yourself a divot to pour from. As the mixture rises in the mold and you think you have a piece thick enough, don’t be bashful about pouring over holes in your scrap wood.
As you can see in the picture, with all of these steps, I still get air bubbles. However, these are negligible since they’re on the surface and I’m cutting that piece away anyhow.
Before I forget, make sure your wood scrap is DRY DRY DRY. Moisture and casting don’t mix well and causes lots of bubbles.
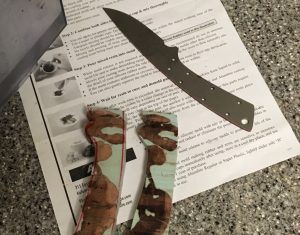
Step 5: Cut the Scales
Using my Rockwell Bladerunner table saw, I split these down the middle. I wanted a thicker handle and being my first try, I wanted enough of an over-sized cut to correct any errors. Once I split it down the middle, I took the edges off and was left with a 3/4-inch thick piece on each side or so. There were some holes in the wood from bugs, so I mixed a few more grains of Alumilite and carefully poured them in.
In hindsight, wait until you sand the knife handle and fill in the holes after.
I can’t say enough about this Rockwell table saw. It really made the project easier with the ability to cut and measure all built in. I used it to cut the scales to the blade’s shape too without a hitch. For this, I simply placed the sides I wanted to see facing out, and traced the blade with a red permanent marker leaving a lot of breathing room.
When cutting the scales to shape, leave room to insure that the scales will cover the knife. You can always take away material, but you can’t add material back.
Step 6: Install the Pins
I cut my brass pins out of the 1/8-inch brass rod oversized. You want working room here as brass sands down easily. I cut the same length of my 1/4-inch brass tube for my thong hole. Again, a hacksaw or Bladerunner would work.
Next, use a power drill and drill bit to match the scales to the handle holes. I used a 1/8-inch bit for the handle holes, and a 1/4-inch bit for the thong hole.
Tip #1: I laid down one side of the scale over a piece of wood I’d drill into, and then place dthe knife blade on top.
Tip #2: After each drilling each hole, place a length of brass pin from the 1/8-inch rod down to keep everything lined up.
After drilling all of those holes through one of the scales, I repeated the process on the other scale using the knife blade as my guide. Make sure things are facing the relative directions for each side in regards to the blade.
If done correctly, everything should line up and you should be able to sandwich both scales over the blade with the brass pins installed. If not, using the proper drill bits and small amount of free-hand movement to create some space shouldn’t hurt. Because we’re using epoxy, spaces will be filled once clamped. Be reserved in this step and keep checking for a snug, but easy fit.
Step 7: Glue it Up
Once everything seems to fit, rough up all the bonding parts with some sand paper and clean.
After that, you can start the epoxy process. I used a cheap 3M wet surface epoxy on mine and I didn’t like working with it. It was the consistency of cold peanut butter and dried grey. When I do this again, I’ll be using Devcon 2-ton epoxy as it has been the most recommended for knife making and has a longer cure time. You’ll want to do this quickly if you’re using a 5-minute epoxy, though I can’t recommend it.
This will be messy, so wear gloves.
Take everything apart and start slathering mixed epoxy on both scales. Once ready, sandwich the blade with the epoxied scales. Start applying the pins while turning to get the pins covered in epoxy. The extra room you made by free handing a drill bit will help here. I had to install 6 small pins and a brass tube. Your mileage may vary.
Once the pieces are together with lots of epoxy between, clamp it down with some wood clamps and let sit for 24-hours.
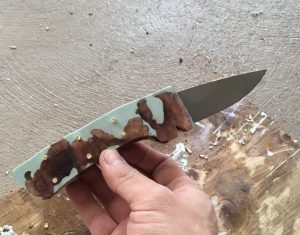
After the epoxy cures, use a peening hammer to lock the brass pins in.

Step 8: Shape the Knife Handle:
At this point, you should have a lot of material over the knife blank. I used 80-grit blaster sand paper made for stripping paint from cars. A rasp may work as well, if you have that on hand. Simply lay down the 80-grit on a flat surface and start on the back of the knife. Then do the same to the flat sides of the knife to get the pins flush with the knife scale. The idea is to get a flush surface to the knife.
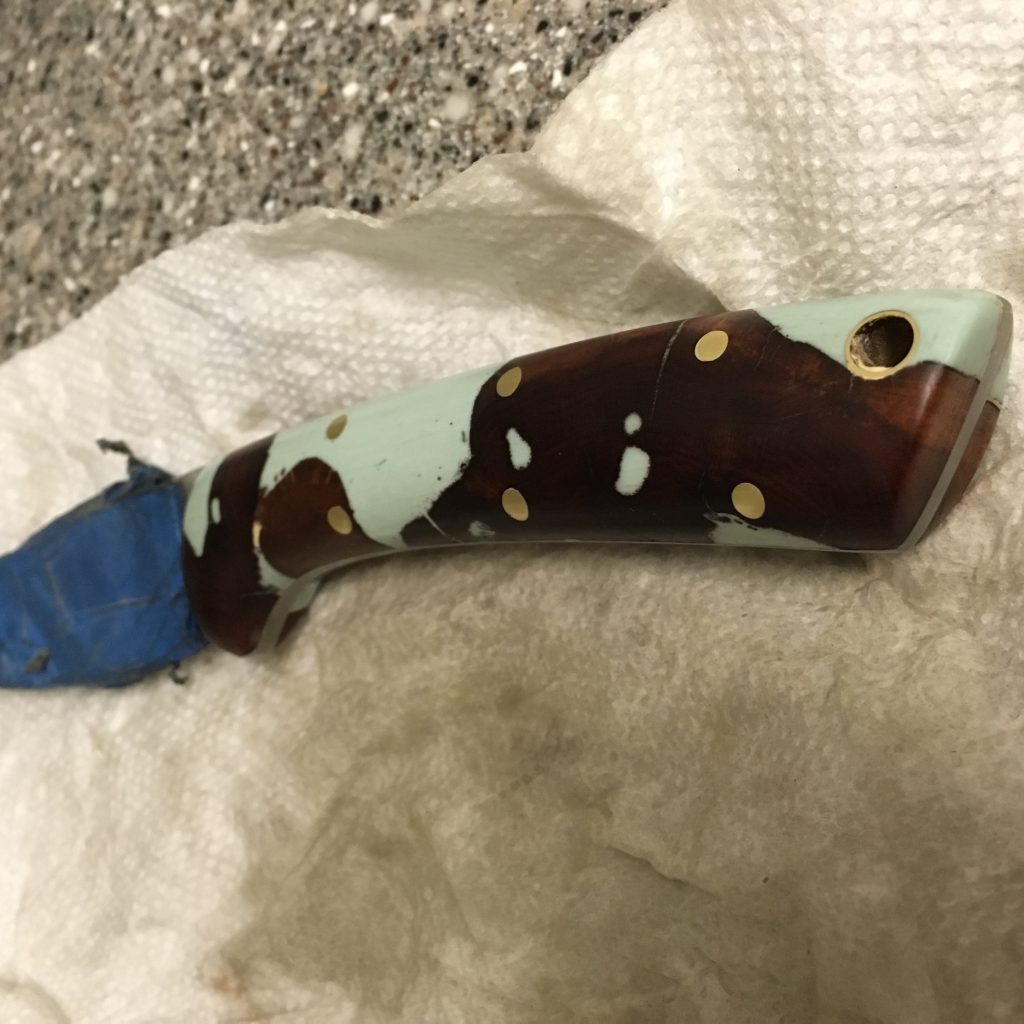
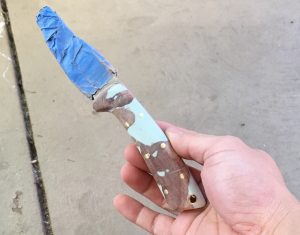
Once you have the rough outline, start adding contouring with the same 80-grit sheet to round off the sides. Some painters tape over the blade’s edge will help in handling of the knife for sanding.
What helped me form the shape of the handle is cutting the 80-grit into strips so that I could wrap the sandpaper around the handle and twist.
Again, make sure you wrap the blade up well while doing this or it’ll be a trip to the hospital. Take your time in this process as you’re shaping the knife handle to how you want it.
Step 9: Polish and Finish the Look
At this stage, I did find air bubbles or imperfections on the knife handle. I simply mixed more Alumilite resin and laid it into the holes and sanded them flush.
Once you have the rough contoured shape of the knife handle, use the assorted sandpaper pack to start bringing the color back.
I started with 200-grit until everything was smooth and uniform, then 400-grit, then 800-grit, then 1600-grit, then 3000-grit. You can stop at 800-grit or 1600-grit if you’d like. This is all up to your preference.
After all that sanding, things should be looking pretty good. I threw on some Feed-and-Wax Wood polish to bring out more color, but any polish or wax would work. The wax coating gives me a piece of mind for the wood’s surface.
Good luck and happy DIY-ing!